Tuesday, April 24, 2012

Growing Family

You may have celebrated noticed that I have been MIA lately.

My family and I went back to the states for a month and boy did we get fat have fun! Okay, no joke. We gained ten pounds each. Except the kids, in fact Morgan even lost weight. Germany doesn't have fine dining like Sonny's BBQ, Zaxby's and the ever so elegant Chik-fil-a.

While we were there we had to make sure to get our family picture taken at Lovely Lane Chapel on the island.

The first time we had our picture was December 31, 2006- my wedding day. Lovely Lane is where we got married and it was a freaking awesome day in Georgia. New Years Eve and the weather was in the 70's.

The second time our picture was taken there was when Morgan was 6 weeks old and we were getting our first family photos taken. That would be back in 2010. It wasn't until we printed the pictures that we realized that one of the pictures was in the same exact spot as one of our wedding pictures.

We then decided the only logical (okay, more like crafty) thing to do was to get our family photo taken there one more time, after we had our final child.

Oh yes, we are done having children. We decided long ago we can only handle two. Why would we want to be out numbered?? Do you realize how smart these little boogers truly are?

So Corey's brother and sister-in-law took their fancy schmancy camera and met us at Lovely Lane Chapel and we posed.

and squinted.

and squirmed.

Did you know that Lovely Lane Chapel faces the West?

Yeah, we didn't either.

Did you also know that kids don't like posing for pictures?

This, we knew.

Did you know that if you squint and at the same time squirm to hold a chubby little boy then you make a weird puffy face?

You do now.

Finally, we decided that this is it. This is our family. We are never on the same page, we don't have perfect posture and picture poses, and honostly we just don't have the time to keep trying while the kids are hungry. So our final picture was complete, March 2012 with husband, wife, daughter and son.

And if you ask me it's completely storybook perfect.


Thursday, March 1, 2012

Tutu Bedskirt


So I saw a tulle bedskirt in the Pottery Barns Kids catalog that I wanted for Morgan. Naturually, I went on to Pinterest to see what bedskirts others have pinned to see if I can find a cheaper, similar one. And then I came upon {this}

By the way, the above is one of my favorite blogs. She is hilarious. I love how she refers to her daughter as The Girl. Morgan needs a nickname like that with all her diva tendancies. Of course, Morgan would prefer Your Highness.

So the $100+ bedskirt turned into a $30 DIY project. I bout peed myself I was so giddy.

The best part about this tutorial is that you can use it also for that tutu nightstand that is circulating Pinterest. Yeah you girls know what I'm talking about. Don't act like you don't spend hours on pinterest until you realize you forgot about all the other s*** you have to do. Just nail the elastic onto the nightstand rather than sew it.

So I followed the blog to the best of my ability. There were a few holes I found (or maybe I just read it in a hurry) so I had to estimate on measurements and a few other things. Just so you know, my measurements are for a queen sized bed and to cover the sides and foot of the bed.

Not too shabby right? Definately doesn't look exactly like the one from the magazine, but the same concept. It's fun, girly, and best part- cost me $30. Fabrics.com has fantastic prices, by the way.

I bought 10 yards of elastic (1/4 inch) and used not even 6 yards. (I intenionally bought more for future projects. I do realize I could have just measured the bed, but thats too easy).
I also bought 15 yards each of aqua and pink tulle. I used about 10 yards of each.
You will also need a sewing needle and string, pins, scissors and an old fitted bedsheet.


Put the fitted bedsheet on the boxspring. I dyed an old white one pink.

Tutorial on making this adorable chunky little boy is gonna cost ya.

And I absolutely love my daughters glamour shot in this picture.


Pin the elastic around the box spring. Now you can pin it on the corner, almost on top to keep it hidden when you put the mattress on top. But just know that when you make the bed, it's gonna be a biotch straightening up the tulle after it gets tucked in underneath. I pinned it more on the side. Morgan's new (future) comforter will cover it.


This part of the tutorial I was unsure of on the other blog. I dont know exactly her specefics, but I removed the pin (something about sharp pins and my two year old just doesn't sit right with me, call me crazy). I hand sewed the elastic to the bedsheet only, not the mattress. I did this about every foot.


Now for the incredibly boring super fun part of cutting. ... and more cutting.

The way my fabric came in is that it was folded in half, then in half again. I cut one of the loops so that I would have two even sheets of fabric folded together. That really doesn't make sense does it. I know that I suck and explaining a few things. Thats why I added a picture (see above). Not that it helps though..


I then cut strips. So they were about 20 inches long, and 6 inches wide. Keep the two folded strips together. They will be looped onto the elastic together.


Insert the folded part (the loop as I have been calling it) under the elastic.


Then pull the rest of the tulle through the loop.


I did the aqua first because  I wanted to evenly space out the colors. I wanted it to be symmetrical on all sides. Very seldom do I pretend to be a perfectionsist. You notice that probably 99% of people like to brag about being a perfectionist. Nope, not me. Whatever path that will get the job done the fastest then I take it.

Okay- this is the last time I'll point it out. Girlfriend seriously needs bedding. Look at all those prints I have going on in there. Looks like a spring flower garden barfed on her bed.


I added in the last color and then went back and added more strips to fill it out better. I also did an extra step. I used safety pins to pin up a few spots that looked like it may start to droop from the tulle. If the tulle is too long then trim it. It doesn't have to be even as it will constantly be shifted around as Girlfriend gets on and off the bed. Did ya see that? I decided I will refer my diva daughter as Girlfriend. Niiice.

So many of you are pregnant (it's like a baby craze going on lately) so I WANT to see this done in a nursery. How friggin cute would that be.


Thursday, February 23, 2012

Just a thought...

When I talk to other mom's about what we do to keep our kid's busy, there has been something in particular that bothers me. We do arts in our house every day, sometimes a couple times a day. Even if it is as simple as scribbling in the coloring book or as extravagant as decorating cookies. I make sure that my children get to exercise their creativity and spend a good part of their day using their imagination.

Here is what bothers me. I often hear mom's say, "we don't really do arts and crafts. I'm not creative."

Mmmmkay.....

.. And what about your kids? Are you just assuming that they aren't creative either?

Have you ever met a kid who didn't like to color? Or paint? Or eat use glue? I didn't think so.

Kid's love to create. They want to explore, invent, pretend. They want to be told that the piece of paper in front of them is all theirs, so go to town. Draw what you want, use the colors you want, get messy and don't stop until the child is happy. And mom, tell them how beautiful it is (even when it looks like they might have just barfed up lunch and called it paint). Encourage them to exercise that creative right side of the brain.

You don't have to be an artist to let your kid be crafty.

In fact with majority of my posts, you don't have to be an artist at all. You just have to have the drive to try  it.

Click here to read 10 ways how kids can benefit from arts and crafts...

And here for how it helps the child's development...

... and if that isn't enough go here to read about how it can help them in school.

EVERY kid is an artist. And as the parent, it is up to you to help them explore their creativity.

Monday, February 20, 2012

Faux Flower Headboard

So I found a super cute idea on pinterest (big shocker there) that I know I just had to do for Morgan. First I should start with the backstory to Morgan's bed. We bought a whole Ashley's Furniture bedroom set for her. I'm talking the whole shabang. Nightstand, chest, dresser, mirror, footboard, headboard and siderails. Only thing missing was the twin mattress and box spring for her new bed. We decided to wait until taxes to get those. Well my mother came to visit here in Germany for Morgan's second birthday and we set up our spare queen bed in Morgan's bedroom for her to stay in while Morgan slept with us (a king bed still isn't big enough when you have a toddler that throws her 25 lb body around at night). Once my mom left Morgan was obsessed with the "big bed" in her room and we just decided it would be easier to let her have it. Now we have a queen bed in her room with no headboard and a twin headboard, footboard and siderails in the garage, waiting to be sold. And now we need to get her a bedding set. She is using her twin comforter and I can't stand seeing the mattress.

This was the easiest, cheapest, cutest solution and I absolutely love it.

Probably more than she does.

The Inspiration  <-- Go to that site to see where  I got the idea and a million other room designing ideas.


This is my version. My inspiration used artificial (silk I'm assuming) flowers for the decor. I, on the other hand, have limited resources to inexpensive flowers so I decided to make my own.

Am I the only one who is totally loving the little blue bird off to the right?


I started by outlining a tree. I highly recommend you use a pencil to draw a tree instead of jumping right into the paint. It's nice to be able to step back and see where you need to add branches, take away, make it skinnier, etc. Then it took me a whole thirty minutes to paint in the tree. Did I mention this was a super quick project? Kinda wish it took longer because I was really enjoying myself.


The flowers and blue bird were by freehand.


Now these are some fun coffee filter flowers. I made a load of these for Morgan's second birthday party and had them all around.


To make one flower you will need three coffee filters, a bowl of water, wax paper and a washable marker. Make sure the marker is washable! Color the edge of the coffee filter. Doesn't have to be perfect because it is going to spread anyways. I did about 1/8 inch thick.


Dip the entire edges of the filter in water. You don't have to hold it there and soak it. Just dip in an edge and rotate it around until the part you put marker on has been dipped.


Lay the filters on a sheet of wax paper. The water will run as it sits there and the marker will spread on it's own. It won't look perfect right away, but as it sits it will start to spread. You can see that the filter on the far left was the first one I did as the water is moving more to the center than the one on the right.

Let them dry completely (you don't want to work with damp filters).


Pinch the center of one filter and crinkle and fluff it so it doesn't look so stiff. Place a second one on the outside and pinch it in the center as well so you are holding two, one inside the other. Do that with the third as well. For the time being I took a mini rubberband to hold together the pinched "stem" of the flower. Later I pushed a nail through all three and nailed it to the wall.

I also made smaller cupcake liner flowers.


Flatten four liners and stack them together. Push a nail through the center. Once it is nailed onto the wall, pinch and fluff the liners individually until you get a pretty carnation.


The flowers will eventually collect dust. A simple feather duster should do the trick. I would recommend dusting them before they look incredibly dirty, that way it doesn't build up and become to difficult. Though, it's not like it will cost you much to replace them.


Wednesday, February 15, 2012

Finger Paint Canvas

So I have been missing for a little bit. My husbands mother came to visit and boy am I grateful that she came when she did! Corey had to go back to the states for school and Morgan got sick.. and stayed sick. Kim, my mother in law, was kind enough to watch baby brother while big sister was lugged back and forth to the hospital. So if you are reading this Kim, I seriously can't thank you enough for making those two weeks that much easier for me!

Now on to the fun stuff. I especially liked this craft today because my 5 month old son took part in it. And boy did he have fun. I'd say more fun than my two year old. However, she is a neat freak and paint all over her hands- yeah, not gonna happen.


I love how different they look. Sam just went for it, couldn't get enough paint between his fingers. Morgan just wanted to stay in one spot. I had to keep turning her canvas to get her to leave a corner. As if she was scared to get dirty.


You will need a canvas (I used 12x12), acrylic paint, sticker paper and painters tape. If you can find the sticker letters that are in a font that you like, then please, go for it. It will save you loads of time.


For Morgan's I used the painter's tape for her initial. For Sam's I picked a font on Word and printed out an 'S' on the sticker paper then cut the letter out. I printed out their names on the sticker paper as well and cut it out. That is when the letter stickers would have come in handy!


I decided to do the first layer of paint. I dipped a crumpled up paper towel and dabbed the canvas. I also wanted to make sure each layer dried before adding the next color. I wanted the three colors I chose to actually look like those colors and not a splatter of brownish/gray.


Then I just let the kids go for it. Feel free to "oooh" and "ahhh" over their undeniable cuteness.


Make sure the paints dry completely before moving on to the next step.


Peel the stickers off carefully. Sometimes the acryclic paint wants to come with, especially if it isn't dry all the way.


Friday, January 27, 2012

Funnel Cake

My beautiful daughter is going through a strange, inconvenient and often annoying phase. She won't eat anything unless it looks like a shape she can identify. Somethings I can get away with, "See! It's like a bouncy ball!" as I hold up an orange. Other's I have to create. Cookie cutters have been my saving grace.

With Valentine's right around the corner, a heart was the most logical route to go. I don't think I would have gotten away with "Look Morgan! It looks like the large intestines string!"


Now I'm not going to let you try this without me telling you the truth. I'm not going to pretend to be the whiz in the kitchen that many of you think I may be. The reason why funnel cakes are normally drizzled in a circle is because the batter has a mind of it's own once it hits the oil. That's a given though, pouring a thicker liquid into a thinner, it's going to float around. You just have to play with it. Try to shape the heart quickly, then swirl inside.
Funnel Cake
1 cup sifted flour
1 tsp baking powder
1/4 tsp salt
1/2 tsp cinnamon
1 egg
1 cup milk
vegetable oil- enough to cover the bottom of the pan, an inch deep

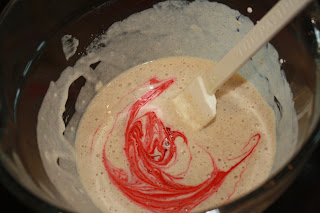
Mix all the dry ingredients together. Add the egg and milk. I then added a touch of red food coloring.


Pour the batter into a squeeze bottle. Make sure all the lumps are out so it won't clog. If you don't have a squeeze bottle you can pour a ladle full into a funnel with your finger stopping the end.

Heat oil on medium high heat. Oil will be ready when you splash water onto it and starts to sizzle. Squeeze out a heart into the oil then swirl to fill in the heart. If it mis-shapes just add more around the outside to reshape it. As long as you are pouring it close enough and partly on top of what you had already squeezed out, then it will stick together.


Flip it after about a minute, then a minute on the other side. Drain on a paper towel. Generously add powdered sugar and any other toppings of your desire.

This is actually a breakfast at our house every now and then. Just to shake things up a bit.

Imagine getting served breakfast in bed with this treat!


Tuesday, January 24, 2012

Southwest Turkey Sliders

Lately I have been trying to makeover my recipes to more healthy versions. I have made sure to increase our fresh fruit and veggie intake. Spinach and fruit smoothie's have become a favorite in our home. We have almost completely cut out red meat. We still have it occassionally, about once every week or so. Ground turkey and chicken tenders have been the usual replacements.

One thing that Corey, my husband, and I took great pride in are our awesome hamburgers. It all started when we were watching the Food Network and heard about some festival somewhere (like we were paying attention to that part. Hello?! There was food on the tv!) that people would go to from around the country to show off their best hamburger ideas. That's when we busted out the grand idea- We need to create a signature burger. And that we did.

This is not the exact recipe. This is a slightly more healthy version. And, of course, smaller (portion control, people).


Majority of my own recipes are very versatile. You will find that a lot of stuff can be replaced for something else that you have in your pantry. That's what I love about it. Who has time to run to the store for one missing ingredient? Not this mom with two young kids.


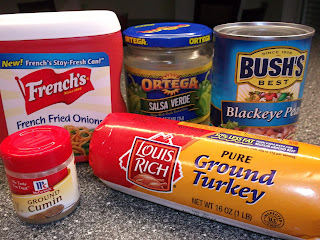
For this you will need:
  • 1 cup French's Fried Onions
  • 1 lb ground turkey
  • 1/2 tsp ground cumin
  • 1/3 cup salsa
  • 1 can beans, drained and rinsed
  • Buns (I normally use the Hawaiin King Honey Wheat Rolls)
  • Pepperjack cheese
I used blackeye peas because my daughter goes crazy for them. However, black beans would be more true to the Southwest part of the sliders. Any bean will work, it's a great add in since we will be using turkey instead of ground beef. Also, I used green salsa because it is what I had on hand. I have always used regular salsa and absolutely love the way it turns out as well.


Pour everything into a large bowl and mix well. Add more fried onions if it seems too runny.

Form into about 2 inch patties with your hands, cook well on the skillet or on the grill. Cook at 250 F that way it cooks slowly and all the way through. Remember that it is turkey, so no medium rare for these sliders! Top with some pepperjack cheese and all other condiments you enjoy. I added spinach and chipotle mayo onto ours.


They taste amazing! It has enough flavor that you won't feel like you are missing out on anything with it not being ground beef.